I’m sharing a job I’ve done more times than I’d like to count: replacing a corroded wheel hub bearing. It’s one of those maintenance tasks that looks intimidating at first, but with patience, the right approach and common tools you likely already own, you can do it safely and save a lot on labor. I’ll walk you through how I handle it step‑by‑step, what to watch out for, and practical tips that make stubborn bolts behave.
Why replace a corroded hub bearing?
A noisy, rough, or wobbly wheel often points to a failing hub bearing. Corrosion accelerates wear, can seize the hub assembly, and ultimately affects safety — braking stability, steering feel, and ABS functioning. I don’t replace bearings on a whim: signs I look for are a growling or humming that changes pitch with speed, play when rocking the wheel with the car on jack stands, or ABS/traction faults related to the wheel speed sensor (often integrated in hub assemblies).
Safety first — what to prepare
Working on wheel hubs requires lifting the vehicle and removing suspension components at times. Take safety seriously:
- Work on level ground and use wheel chocks.
- Use quality jack stands — never rely on the jack alone.
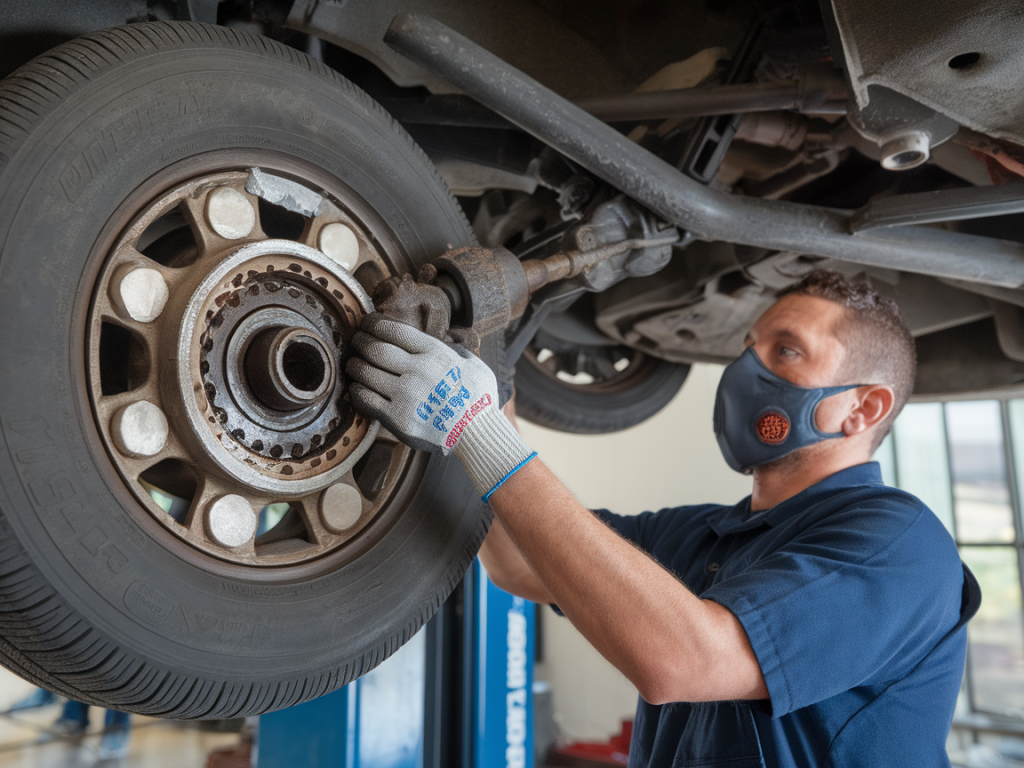
- Wear safety glasses and gloves; rust and debris get everywhere.
- Have a fire extinguisher and first aid kit nearby.
- If the vehicle has high corrosion, expect to need penetrating oil and time — don’t rush bolts.
Tools and parts I bring
I try to keep this job doable with common tools. Below is what I usually use; adjust for your vehicle model and torque specs.
| Basic tools | Purpose |
| Floor jack + jack stands | Lift and secure car |
| Socket set (metric and SAE), breaker bar | Remove wheel, hub bolts, caliper |
| Torque wrench | Reinstall to manufacturer specs |
| Pry bar, hammer, dead-blow hammer | Free stuck components |
| Penetrating oil (PB Blaster, Kroil) | Loosen rusted bolts |
| Wire brush, copper grease | Clean surfaces, prevent future seizing |
| Hub puller or slide hammer (optional) | Remove pressed-in hub assemblies |
| Replacement hub bearing (OEM or quality aftermarket) | New component |
| New axle nut (if applicable) and wheel studs | Replace worn/round hardware |
Preliminary checks and ordering parts
Before getting under the car, I verify the exact replacement part number. Many cars use integrated hub assemblies (bearing press-fit inside hub) while others have pressed wheel bearings. I check VIN-based parts lookups or use reputable suppliers like RockAuto, Motorcraft, or NTN/Koyo for bearings. If your hub includes the ABS tone ring or sensor, I match that or plan to reuse if undamaged.
Step‑by‑step procedure
I’ll describe a typical front wheel hub replacement where brake caliper, rotor and possibly lower control arm disconnect is required. Adapt these steps for rear hubs or vehicles with different layouts.
1. Prepare the vehicle
Chock rear wheels, loosen lug nuts slightly while car is on the ground. Lift the front with the floor jack and support securely on jack stands. Remove the wheel.
2. Remove brake components
Remove the caliper and hang it out of the way with a bungee or wire — don’t let it dangle by the brake hose. Take off the rotor. If the rotor is stuck from corrosion, tap it gently with a mallet after removing any retaining screws or clips.
3. Access the hub
Remove any dust caps, cotter pins, and the axle nut (if present). This often requires a long breaker bar and penetrating oil. For corroded nuts, apply PB Blaster and let it soak 10–20 minutes. Keep the vehicle in gear or set the parking brake before breaking axle nut torque.
4. Detach hub from knuckle
Unbolt the hub assembly from the steering knuckle — usually 3–4 bolts behind the hub. If bolts are seized, spray penetrating oil and heat with a heat gun (not flame) to expand metal slightly. Use a breaker bar and a cheater pipe if needed but avoid rounding bolt heads. In extreme cases I cut the heads and use a grinder, but that’s last resort.
5. Remove the old hub/bearing
Once bolts are out, the hub may still be stuck due to corrosion. A hub puller or slide hammer works well. Alternatively, strike the knuckle where the hub edge meets with a heavy hammer to break the rust bond — protect the knuckle and suspension with a block of wood if hitting near sensitive spots. Clean mating surfaces with a wire brush once removed.
6. Inspect nearby parts
Before installing the new hub, check wheel studs, ABS sensor, tone ring, and knuckle for damage. Replace studs if they’re heavily corroded or rounded. Check spindle for scoring if applicable. Clean the bearing bore thoroughly; any nicks will shorten bearing life.
7. Install the new hub
Apply a thin film of anti-seize or copper grease to the mating surface (not inside the bearing inner race). Press the new hub in by hand if it seats easily; otherwise, use the hub bolts as pullers or a press. Torque the hub-to-knuckle bolts to OEM spec — I keep a repair manual or factory torque chart handy (typical ranges: 70–150 Nm depending on vehicle; confirm exact spec for your car).
8. Reassemble axle and brakes
Install the new axle nut (if required) and torque to spec; some manufacturers call for a specific sequence and torque plus cotter pin. Reinstall the rotor and caliper, torque caliper bolts, and bleed brakes if you disturbed hydraulic connections. Mount the wheel, lower the car slightly so the wheel touches ground to snug lug nuts, then torque lugs to spec once fully lowered.
Tips for dealing with corrosion and stuck parts
- Penetrating oil is your friend. Apply, wait, reapply. I often spray the day before and again an hour before attempting removal.
- Heat loosens rust bonds. A handheld heat gun applied around the bolt head or hub center can help — avoid heating rubber or ABS sensors.
- Use impact sockets and an impact wrench if you have one; they save time and reduce rounding bolts.
- Label and bag hardware as you remove it. Corrosion often means some fasteners are one‑time‑use — replace if thread damage is visible.
Common mistakes to avoid
- Relying on a single jack without stands — that’s the biggest hazard.
- Forcing components without cleaning mating surfaces — you’ll distort or break parts.
- Greasing the bearing race — never lubricate an internal bearing surface unless the bearing is serviceable and specified to be repacked.
- Reusing damaged axle nuts or cotter pins — these are inexpensive parts that provide critical safety.
How I verify the job
After reassembly I take the car for a short, cautious test drive. I listen for any abnormal noise at speeds where the old bearing was loudest and feel for steering pull or vibration. I recheck wheel nut torque after a few dozen miles. If the vehicle has ABS, I confirm no warning lights appear and that braking feels normal.
If you’re unsure at any point, consult a factory repair manual or seek a professional. Some hubs require a press and specific procedures that are easier with shop equipment. But for many everyday cars, following these steps will get you a quiet, solid wheel and a lot of satisfaction from doing the job yourself.