I’ve had more than one late-night call from drivers stranded near a grocery store or at home because the 12V lithium-ion auxiliary battery in a Tesla had gone flat. It’s a stressful situation because a dead 12V can leave the car locked down, lights on, touchscreen dark, and — if mishandled — can trigger Sentry Mode, alarms, or worse, damage sensitive electronics. Over the years I’ve developed a practical, safety-first routine to revive a flat 12V in a parked Tesla without tripping vehicle security. Below I share that routine, the equipment I use, and the key warnings to keep you and your car safe.
Why the 12V matters and what can go wrong
The 12V battery in a Tesla powers vehicle electronics: door locks, displays, sensors, and the car’s security systems. Even though the main high-voltage battery has energy, the car’s computers need the 12V system to boot. A deeply discharged 12V can make the vehicle unresponsive or leave it in a state where opening the door or attaching cables triggers Sentry Mode or other security features.
Common pitfalls I’ve seen:
- Rushing to jump-start from another vehicle without disabling Sentry Mode — alarms and alerts are guaranteed.
- Using a high-current jump start pack directly on terminals without in-line protection — risk of smoke, melted connectors, or fried electronics.
- Fiddling with connectors and waking the car inadvertently (which can drain the battery further or unlock systems in the wrong order).
Gear I recommend carrying
Not all jump starters or chargers are created equal. I keep the following in my toolkit:
- Smart 12V jump starter with reverse-polarity protection and soft-start (e.g., NOCO Boost series or similar).
- Inline fuse or fused jump leads (30–60A) to prevent high fault currents.
- Small portable 12V battery charger/maintainer capable of limited current (1–5A) for slow recovery.
- Multimeter to verify voltages before and after.
- Insulated gloves and eye protection.
Prepare the car — disable things that will trip security
Before you touch cables, take these steps from the driver’s phone or key (if possible):
- Open the Tesla app and disable Sentry Mode. This is the single most important step to avoid alarms when you approach or connect equipment.
- Disable Cabin Overheat Protection and any scheduled functions that might wake the car.
- If the car is locked and the app can’t connect, use the key/card to unlock doors and manually press the wireless key to ensure the car is not in an alert state.
- Put the car in Park and make sure doors are closed when you begin connections.
Assess the battery
Use the multimeter to measure the battery terminal voltage. Typical healthy 12V Li-ion should be around 12.6–13V when resting (after the car has been off a while). If the voltage is under ~10–11V it’s deeply discharged and may need a controlled slow charge before a big jump is safe.
Step-by-step: revive safely
This is the step-by-step process I follow when reviving a Tesla 12V without tripping security.
- Step 1 — Disable Sentry Mode: Confirm via app or by accessing the car. Walk away if you can’t; call Tesla if app connection fails.
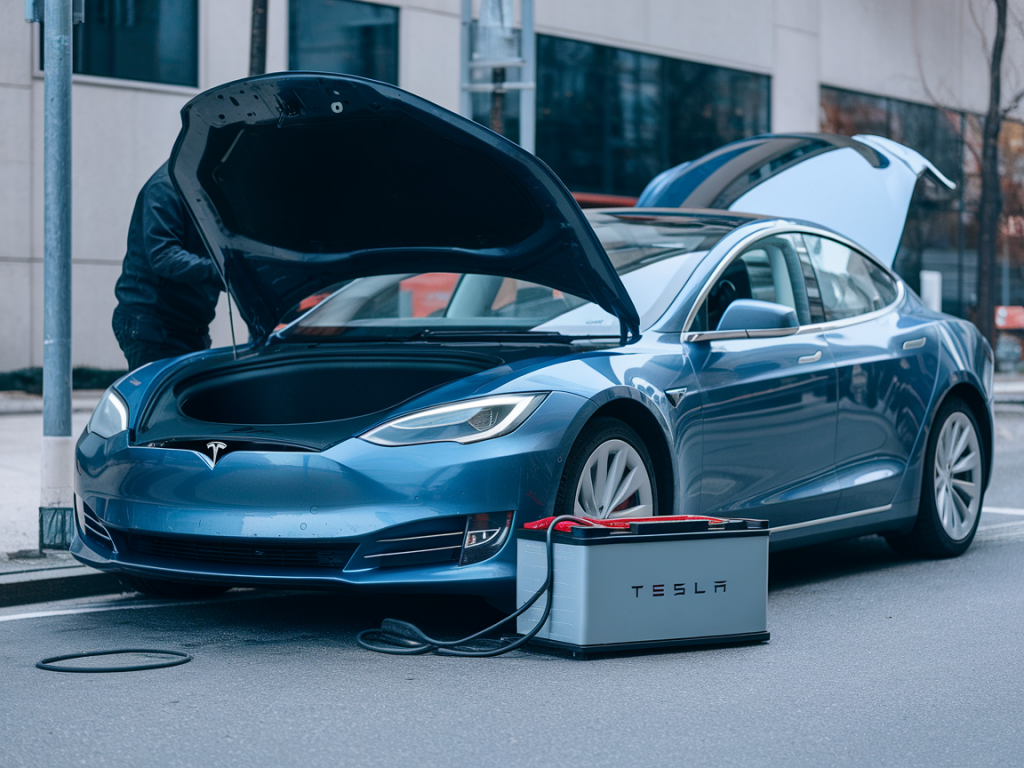
- Step 2 — Access the correct jump point: Depending on the model year, Tesla provides a designated 12V jump terminal (often in the frunk or under a cover in the nose). Do not try to clamp onto exposed electronics or the negative terminal on random chassis studs unless specified in the owner manual.
- Step 3 — Inspect and prepare: Ensure clamps and connectors are clean and tight. Fit an inline fuse on the positive lead if your jump pack doesn’t have internal protection.
- Step 4 — Use a smart jump starter with soft-start: Connect positive to positive jump terminal and negative to the designated chassis point or negative terminal as specified by Tesla. Switch on the jump starter and let it apply a limited current. Watch voltage — if it rises slowly to ~11.5–12V, keep it connected 5–15 minutes. Avoid a crude full-current jump that can stress electronics.
- Step 5 — Use a slow charger if voltage is very low: If voltage is under ~10V, I prefer a small 2–3A charger/maintainer first. Connect with correct polarity, let it sit until voltage recovers to ~12V, then switch to a jump starter to bring the system fully online.
- Step 6 — Attempt to wake the vehicle: After voltage reaches ~12V, try unlocking or pressing the brake pedal. If the car boots, allow it a couple of minutes to run systems and charge the 12V through the DC-DC converter.
- Step 7 — Monitor and disconnect: Once the vehicle is awake and displays normal systems, disconnect the negative clamp first, then the positive. Keep an eye on app alerts for any faults.
Alternative: service disconnect and the high-voltage option
On many Tesla models you can access a service disconnect or the 12V battery under the rear seat/ frunk. Some experienced technicians use a bench battery or dedicated DC-DC power supply to apply a controlled 12V. I don’t recommend bypassing Tesla’s designed jump point unless you know the car and model very well — incorrect connections can wake modules in the wrong order and trigger security events.
How to avoid tripping security and alarms
- Always disable Sentry Mode via the app before approaching the car.
- Minimize door openings and trunk access while performing the revival.
- Use the car’s app to check status during the operation — it will often show if the car reboots or reports alerts.
- If an alarm does eventuate, do not panic. Use the app to stop Sentry Mode and check notifications; if the car triggers a call to Tesla Roadside Assistance, be ready to explain the steps you took.
Quick troubleshooting if the car won’t wake
- If voltage rises but the car still won’t respond, try a short rest (5–10 minutes) and then reattempt. Some modules need time to reset.
- If the 12V immediately collapses when you attempt to wake the car, suspect a faulty 12V battery or a parasitic drain. In that case, remove service is limited; call Tesla Roadside or a professional.
- If the car shows specific error codes on the displays after waking, photograph them and share with Tesla or a technician — those codes guide repair.
Table: Methods compared
| Method | Speed | Risk to security/electronics | When to use |
|---|---|---|---|
| Smart jump starter (soft-start) | Fast | Low if fused and correct polarity | Most roadside revives |
| Slow 12V charger/maintainer | Slow | Very low | Deeply discharged batteries |
| Jumper from another car | Fast | High (risk spikes, wrong grounding) | Last resort with proper isolation and fuse |
| Service DC-DC supply | Controlled | Low when used properly | Professional or experienced DIY only |
If you’re ever unsure, call Tesla Roadside Assistance — they have procedures and trained technicians for these exact situations. I always prefer the slow, controlled approach over a risky quick fix. When done carefully, you can revive the 12V, avoid alarms, and get back on the road with no drama.