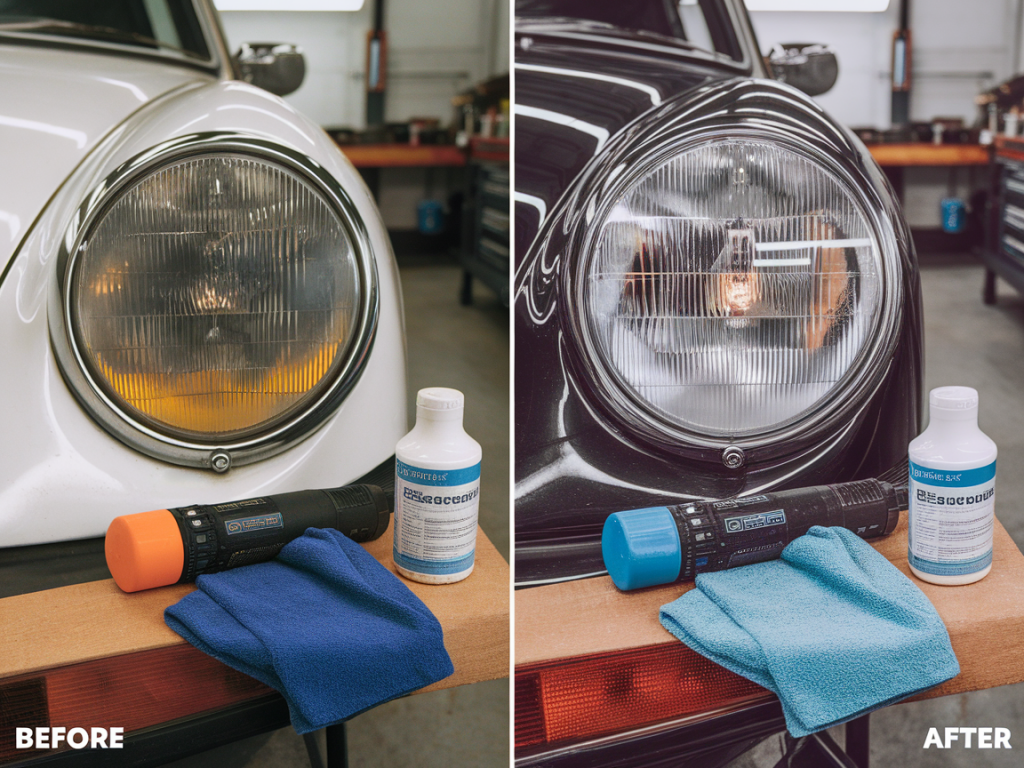
I’ve fixed dozens of faded, cloudy headlights in my garage and on friends’ cars, and I still get a little thrill when a dull, yellowed lens comes back to life. Restoring headlights is one of those high-impact, low-cost jobs that makes a car look newer and—more importantly—dramatically improves night-time visibility. In this guide I’ll walk you through how to restore faded headlights in about 30 minutes using common products and simple techniques. No fancy tools required, just some elbow grease and the right approach.
Why headlight restoration matters
Headlights get hazy because their outer polycarbonate lens is coated with a UV-protective layer that breaks down over time. Sun, road grit, and chemicals wear that layer away, leaving the plastic oxidized and yellowed. That cloudiness cuts down light output and creates glare for oncoming drivers. In practical terms, restoring headlights can increase usable illumination distance and make night driving safer—something I always prioritize in my reviews and maintenance tips.
What you’ll need (30-minute kit)
Here’s a simple kit that will get you through a quick 30-minute restore. I choose products that are easy to find: local auto parts stores, big-box retailers, or Amazon. If you plan to keep the results longer, you can add a UV sealant (I’ll mention options below).
- Soap and water or an automotive cleaner
- Masking tape to protect paint
- Sandpaper packs: 400, 800, 1500, and 2000 grit (or a 1000/2000 combo if time is tight)
- Polishing compound (plastic polish or a fine rubbing compound)
- Microfiber cloths
- Spray bottle with water for wet sanding
- Optional: drill-mounted foam pad or random orbital polisher to speed polishing
- Optional: UV protectant/sealant (e.g., 3M Headlight Lens Restoration UV Sealant or Mothers UV Protectant)
How long it takes
If you’re doing both headlights and you’re methodical, plan on about 25–45 minutes. For a quick 30-minute job, skip the finer sandpaper steps and focus on 800 → 1500 grit followed by a thorough polish and UV seal. That will dramatically improve visibility and look significantly better. For the longest-lasting finish, take 45–60 minutes and include 400 grit at the start and finish with 2000 grit before polishing, then apply a UV sealant.
Step-by-step: 30-minute restoration
I’ll assume you want a fast but good result. Work on one headlight at a time.
1. Clean and tape
Wash the lens with soap and water to remove dirt and grime. Dry it, then use masking tape to cover paint, trim, and the grille around the headlight. You don’t want sandpaper or polish on painted surfaces.
2. Wet-sand (the heart of the restore)
Start with 800 grit soaked in water. Keep the surface and the sandpaper wet—this reduces heat and prevents deep scratches. Sand in consistent horizontal strokes across the lens until the surface looks uniformly hazy. That can take 3–5 minutes. Switch to 1500 grit and sand in vertical strokes to remove the 800 grit scratches, then finish with 2000 grit in circular motions if you have time. For a 30-minute job, 800 then 1500 is acceptable.
3. Polish
Apply a small amount of polishing compound to a microfiber cloth or foam pad. Rub in firm, circular motions. If you use a drill or orbital polisher, keep the speed moderate and let the pad do the work—don’t press excessively. You’ll see clarity return as you polish. This usually takes 3–7 minutes per headlight depending on equipment.
4. Clean and inspect
Wipe the lens with a clean microfiber cloth and inspect in good light. If there are still milky areas, repeat the polish step or go back one grit level and sand again briefly before polishing.
5. Protect (optional but recommended)
For best longevity, apply a UV sealant. Many kits include one; if not, use a dedicated product and follow the manufacturer’s instructions—usually spray or apply with a cloth, let cure, and buff. This step adds 5–10 minutes but can double or triple how long the restored clarity lasts.
Troubleshooting common issues
- Remaining haze after polishing: You probably missed a sanding grit or didn’t remove deeper oxidation. Revisit the sanding sequence, or use a slightly coarser step briefly, then polish again.
- Orange peel or swirl marks: Often from aggressive polishing or a dirty pad. Clean the pad and finish with a fine polish or glaze.
- Paint damage from sanding: If you sand the paint, stop, clean the area, and use a fine rubbing compound or touch-up paint to correct it. Proper masking prevents this.
Products I recommend (what I use)
| Sandpaper | 3M or Norton wet/dry sandpaper packs (400–2000 grit) |
| Polish | Mothers Plastic Polish, Meguiar’s PlastX, or a fine rubbing compound |
| Sealant | 3M Headlight Lens Restoration UV Sealant, Mothers UV Protectant |
| Machine option | Random orbital polisher (like Ryobi or Porter-Cable) with soft foam pads |
How long will it last?
Short answer: with no sealant, expect 6–12 months of improved clarity before yellowing returns. With a quality UV sealant and regular washing, you can extend that to 1–3 years. Keep in mind that headlights that are deeply pitted or cracked may not fully respond—the plastic can be permanently degraded and may require replacement.
Quick cost estimate
If you already have basic tools: about $10–$25 for sandpaper and polish. A full kit with sealant is typically $20–$40. Hiring a detailer or buying a professional kit costs more but saves time.
Aftercare and tips
- Wash headlights regularly and park in shade when possible to slow UV damage.
- Avoid harsh chemicals on the lens—you’ll eat away at any remaining protective coating.
- If you want a near-permanent solution, consider aftermarket headlight restoration films or replacing the lens assembly—these are more expensive but last longer.
- Test your headlights after restoration by driving at night or using a dark garage to check beam pattern and brightness. Real improvement should be noticeable immediately.
Restoring headlights is one of those high-value jobs I always recommend to readers: low cost, short time investment, and a big payoff for safety and appearance. If you want, I can put together a shopping list for your specific car or recommend a quick kit that matches your timeframe and budget—just tell me your car make and model and whether you prefer a fully DIY approach or a machine-assisted job.