A leaking fuel tank sender can turn everyday driving into a guessing game: one minute your Ford Transit shows half a tank, the next it reads empty while the range still shows hundreds of miles. I’ve dealt with this on a few Transits, and replacing the sender—and making sure the new unit reads accurately—takes a bit of patience but is perfectly doable in a home garage. Below I’ll walk you through why senders fail, how to replace them safely, and the calibrations and checks I use to avoid false fuel gauge readings afterward.
Why the sender fails and how that causes false readings
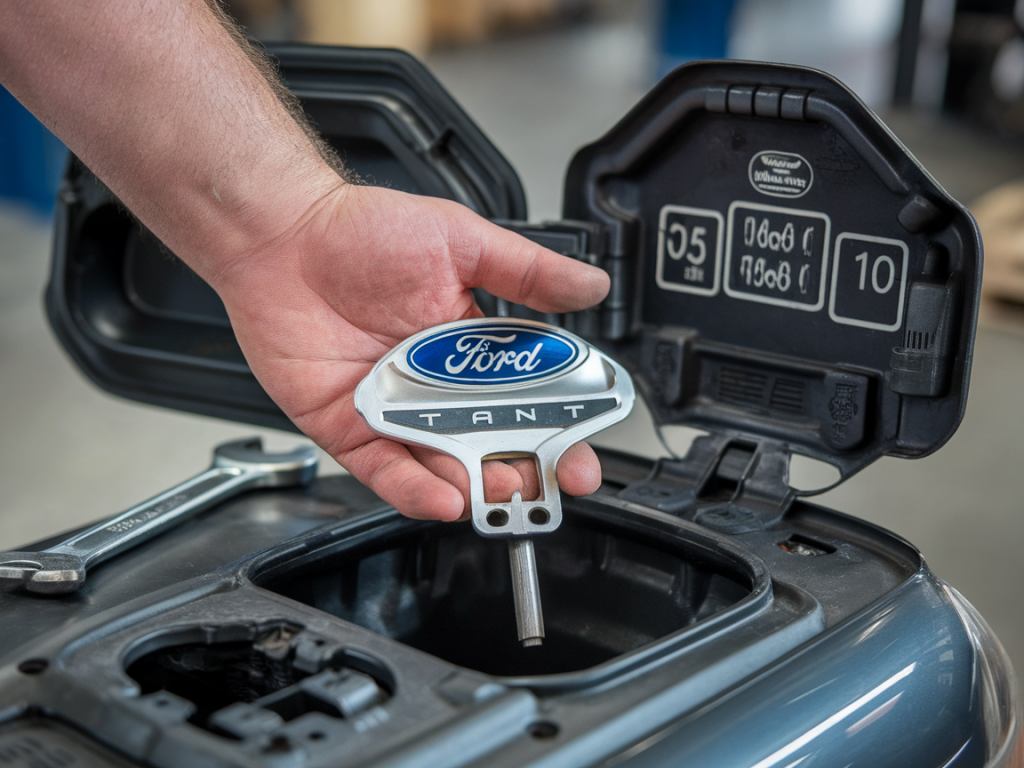
The fuel tank sender (fuel level sending unit) is a mechanical/electrical assembly that includes a float, an arm, and a variable resistor. Over time, corrosion, foam disintegration, fuel contaminants, or a worn resistor track cause the sender to stick or output incorrect resistance values. On Ford Transits—especially high-mileage vans—the foam float can break down, or the wiring/connectors corrode, creating intermittent readings that the gauge interprets as low or fluctuating fuel level.
Common symptoms I’ve seen:
- Gauge jumps up and down while driving.
- Gauge reads empty even after filling the tank.
- Inconsistent instrument cluster warnings for low fuel.
- Fuel smell near the sender area, indicating a leak.
What you’ll need
Before you start, gather parts and tools. I always get everything ready so I don’t have to crawl under the van with a fuel canister after I’ve started.
| Parts | Notes |
|---|---|
| Replacement fuel tank sender | OE or quality aftermarket compatible with your Transit year (e.g., Motorcraft for OEM fit). |
| Replacement O-ring/gasket | Always replace the seal to avoid leaks. |
| Fuel line quick-disconnect tools (if needed) | Some Transits use quick-connects for vent/fuel lines. |
| Dielectric grease | Protects electrical connectors against corrosion. |
Tools:
- Socket set and ratchet (including extension)
- Torque wrench (for proper seal torque)
- Flat and Phillips screwdrivers
- Multimeter (essential to test sender resistance)
- Fuel catch pan and absorbent rags
- Jack and stands or ramps (if needed for access)
- Pry tools or panel remover (for accessing sender from inside the vehicle on some models)
Safety first
Fuel is flammable and vapours are dangerous. I never work on a fuel system near open flames, smoking materials, or electrical sparks. Work in a well-ventilated area, have a fire extinguisher rated for fuel fires nearby, and keep rags in a sealed metal container after use.
Before touching anything:
- Disconnect the negative battery terminal to prevent sparks.
- Relieve any fuel system pressure if your model requires it.
- Wear safety glasses and nitrile gloves.
Accessing the sender on a Ford Transit
Depending on the model year, Transits often have an access panel under the rear seat or in the cargo area floor. On older vans you may need to lower or drop the fuel tank—check your workshop manual.
- If there’s an access cover, remove the carpet and panel screws. You’ll see the sender mounted on top of the tank with a ring or bolts.
- If the tank must come down, support it with a jack and straps, disconnect the fuel lines and vent hoses, remove strap bolts, and lower carefully. Keep the tank as level as possible to prevent spilling fuel.
Removing the old sender
Once you can reach the sender:
- Disconnect the electrical connector—carefully pry out any locking tabs. Inspect the connector for corrosion.
- Disconnect fuel lines attached to the sender assembly. Use a fuel catch pan to collect any drips.
- Remove the locking ring or bolts. Heat with a hairdryer if the ring is seized (don’t use open flame).
- Lift the sender straight up. Be mindful of the float arm—don’t bend it.
- Inspect the gasket/seal area and clean the flange on the tank to remove old residue.
Testing the old sender (why I always check it)
Before tossing the old unit, I test it with a multimeter. Place the sender on a clean surface, move the float arm through its full travel, and watch the resistance. A healthy sender moves smoothly and shows a linear change in resistance (e.g., ~10–90 ohms depending on system; check factory spec for your Transit). If you see dead spots, jumps, or open/infinite resistance intermittently, it’s confirmed bad.
Installing the new sender
Installation is the reverse of removal, with attention to sealing and electrical connections:
- Fit the new O-ring/gasket—lightly coat with a film of clean fuel or specified assembly lube to ease installation and prevent pinching.
- Carefully insert the sender so the float arm sits correctly in the tank. Don’t force or bend it.
- Secure the locking ring or bolts to the specified torque (consult a manual; over-torquing can warp the flange and cause leaks).
- Reconnect fuel lines and the electrical connector. Apply a small dab of dielectric grease to the connector pins to prevent corrosion.
- If you dropped the tank, lift and secure it back on the straps and torque the straps per spec.
Preventing false gauge readings—calibration and checks
Replacing the sender often fixes false readings, but I always run a few checks before I call the job done:
- Reconnect the battery and turn the ignition to the ON position (do not start). Watch the fuel gauge—many clusters do a self-check sweep and should now show a realistic reading.
- With the multimeter, back-probe the sender connector and verify the resistance corresponds to fuel level (or compare to the expected value for “full”). Move the float if accessible to see smooth changes in resistance.
- Drive a short route and note whether the gauge responds realistically to consumption. If the gauge still behaves oddly, check for poor ground at the tank or corroded harness—grounding issues are a frequent culprit.
- If your Transit has a body control module or requires a software recalibration after sensor replacement (some newer models do), use Ford IDS or a compatible scan tool to clear fuel system adaptations and read live data from the sender to confirm accuracy.
Common pitfalls and troubleshooting
From my experience, these are the usual things that bite you:
- Wrong part: Aftermarket variants may have different resistances or float geometry. Always match part numbers or use OEM Motorcraft parts for peace of mind.
- Sealing leaks: Reusing an old gasket or over-torquing the ring leads to leaks and smells. Replace the seal and torque properly.
- Wiring/ground issues: Even a new sender won’t read right if the wiring loom is corroded or the ground strap is bad. Inspect and clean ground points.
- Float hitting obstructions: Internal tank deformities or debris can snag the float. If the float arm doesn’t move freely when the sender is out, that’s a red flag.
Fixing a leaking sender and eliminating false fuel gauge readings takes some methodical checks, but it’s very satisfying to end with a reliable gauge. If you run into a specific problem—weird resistance readings, an unexpected leak, or an ECU that refuses to accept the new sensor—tell me the Transit year and what your multimeter shows and I’ll help you diagnose the next step.